Fri 27 May 2016
In Android, the permission system was one of the major security concerns of the platform for many reasons:
- The user has only two choices, he either allows the application to have all the permissions during the installation without having any clue why and when the app will use them, or denies the permissions and cannot use the application at all(take it or leave it offer).
- Once the permission is granted during the installation, the application can use it during its lifecycle without any notification and the user cannot deny the permissions unless he removes the application from the device.
- It is not transparent for users, but also for developers. You might have a cool feature in your app which required a specific permission, but if you don't educate the user and give him context why you need it, the user can find it suspicious and decides to not install your application.
- There is over 130 unique permissions available in Android. Even if the user checks the permissions one by one during the installation, he can quickly get confused (What is exactly BODY_SENSORS ? what is the difference between BLUETOOTH, BLUETOOTH_ADMIN, BLUETOOTH_PRIVILEGED ?)
Finally Android permission system is redesigned !
Starting Android (6.0 Marshmallow), application will not be granted any permission at installation time. Instead, application has to ask the user for a permission one-by-one at runtime. It is an important step to protect the users privacy by allowing them to choose what the application can access and what it can't and the user still have the option to use the application.
Developers should understand the new permission system and adapt the application to handle all the cases and give users a good user experience.
So as a developer, what should I know about the new Android's permission system:
1- There are two kind of permissions: Normal permissions and dangerous permissions
- Normal permissions allow the application to access external data excluding the user's private information.
You can check the full list here.
- Dangerous permissions allow the application to access the user's private information.
2- For all Android versions, each time you want to use a permission (both normal and dangerous permissions), you need
to add the appropriate
3- Normal permissions are granted automatically, and you don't need to request them at runtime.
4- If you try to access a private information, you need to explicitly require its "dangerous permission" at runtime,
otherwise the method will throw a SecurityException causing a crash of the application.
5- The user can revoke a granted permission anytime !
6- Permissions are grouped into Permission Groups, so if the user has previously granted a permission of a specific
group, you can use all the other permissions of that group without requesting them again.
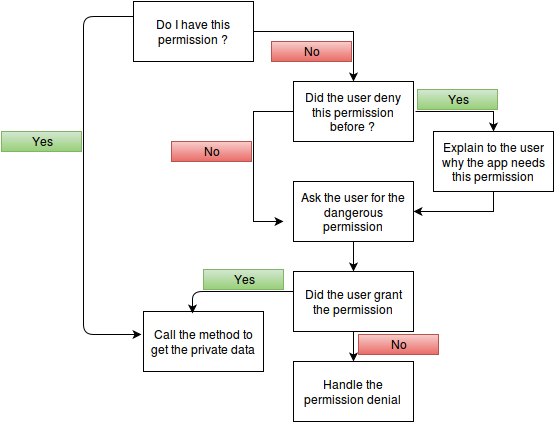
7- To adapt your application to the new permission system, you need to follow the logic below:

8- Since an example is worth a thousand words, let's go through some code. In this example, we will request the
permission SEND_SMS (see comments):
//Unique identifier to identify each permission request
final private int REQUEST_CODE_ASK_PERMISSIONS = 999;
private void sendSMSWrapper() {
    //Check to see if the permission is available
    int hasSendSMSPermission = checkSelfPermission(Manifest.permission.SEND_SMS);
    if (hasSendSMSPermission != PackageManager.PERMISSION_GRANTED) {
     //if the permission is not granted, check if the user has already denied this request
            if (!shouldShowRequestPermissionRationale(Manifest.permission.SEND_SMS)) {
  //Explain to the user why we need to send the sms
      Snackbar.Make(layout, "Send SMS is required to share the new events with your contacts.", Snackbar.LengthIndefinite)
             .SetAction("OK", v => RequestPermissions(Manifest.permission.SEND_SMS, REQUEST_CODE_ASK_PERMISSIONS))
             .Show();
      return;
            }
 // request the permission
        requestPermissions(new String[] {Manifest.permission.SEND_SMS},
                REQUEST_CODE_ASK_PERMISSIONS);
        return;
    }
    // execute your code using the user's private information
    sendSMS();
}


@Override
public void onRequestPermissionsResult(int requestCode, String[] permissions, int[] grantResults) {
    switch (requestCode) {
        case REQUEST_CODE_ASK_PERMISSIONS:
            {
            // Check for SEND_SMS
            if (CheckSelfPermission(Manifest.permission.SEND_SMS) == PackageManager.PERMISSION_GRANTED
       {
                //Permission Granted
                sendSMS();
            } else {
                // Permission Denied
         var snack = Snackbar.Make(layout, "Send SMS permission is denied.", Snackbar.LengthShort);
         snack.Show();
            }
            }
            break;
        default:
            super.onRequestPermissionsResult(requestCode, permissions, grantResults);
    }
}
9- To ensure the backward compatibility, we recommend to use Support Library v4 which implements the new methods for Android API level < 23, so you can write only one code and the library will return the corresponding value based on the Android version. Otherwise, you need to check manually the Android version and apply the old permission system for Android API level < 23 and the new permission system for the newer Android API level.
if (Build.VERSION.SDK_INT >= 23) {
    // Runtime permission system
} else {
    // Old permission system
}
10- It is important to understand the new Android's permission system in order to give your users a better user experience. However, to make your code shorter and cleaner, you can handle the permissions using a 3rd party library. Our favorite is PermissionsDispatcher which provides a simple annotation-based API and covers all the basic usages.
11- To learn more about the new permission system, you can check the following references:
- Declaring Permissions
- Using Permissions
- Permissions Best Practices
- List of all Android permissions
- Android Marshmallow 6.0: Asking For Permission