Mon 11 March 2024
Introduction
Security experts can probe deeply into the behavior of programs during runtime to identify security flaws and malicious activity. Even for iOS applications, as a security researcher, you can intercept and inspect system calls, track memory allocations, and inject custom code into running processes. Thus uncovering hidden vulnerabilities, swiftly (pun intended) identifying and neutralizing emerging threats.
Dynamic Instrumentation Explained
In contrast to traditional static analysis methods, which examine code before execution, dynamic instrumentation works in real-time. It creates a connection with programs while they run in order to monitor, adjust, and enhance their behavior.
Researchers can monitor important events like system calls, memory accesses, and network interactions by carefully inserting specialized instrumentation code; also known as probes or hooks, into the target application's binary or bytecode at the operation's beginning.
These hooks allow for real-time monitoring, profiling, debugging, and security analysis as the instrumented program runs by releasing data or triggering actions in response to predetermined situations. Consider it as breakpoints you insert into your code, which will cause a callback to be initiated when the code reaches the breakpoint. The final step would be to analyze the collected data to gain insights into the runtime behavior of the application. It is worth mentioning that this analysis is not restricted to security analysis but could involve debugging and profiling depending on your objectives.
Let’s get rolling
The full flow of the process can briefly be described as follows:
1. Find the target application.
2. Identify monitoring points aka the hooks.
3. Write instrumentation code using any instrumentation framework.
4. Inject instrumentation code.
5. And finally, analyze the results & stack traces.
Identifying Hooks
An application will have thousands of functions. Only a few of these are interesting for security researchers, and thus the first step of the whole process is to identify the functions that should be monitored. We then need to find the symbols to use for hooking.
We can achieve that by using the nm CLI tool made specifically to list symbols from object files.
Let’s suppose we want to instrument a dummyFunction, inside DummyModule.swift:
public class Dummy {
    public class AnotherDummyClass {
        public func dummyFunction(intDummyArg: Int, stringDummyArg: String, booleanDummyArg: Bool) -> String {
            return "I am just a dummy function."
        }
    }
}
We compile & run the command nm -g DummyModule command, and our symbol look like this:
$s11DummyModule0A0C07AnotherA5ClassC13dummyFunction03intA3Arg06stringaH007booleanaH0SSSi_SSSbtF
Swift name mangling
Symbol resolution is one of the linker's duties in the compiler design; it matches symbols declared in one file with references to those symbols in another file to resolve symbolic references between object files.
Name mangling is not necessary in a language like C, since there can only ever be one function or item of data by any given name (a symbol). Things get tricky in languages that allow the overloading and templating of similar selectors on the same class with different signatures.
Eg:
    int add(int a, int b)

    float add(float a, float b)
The compiler mangles the symbols, meaning it gives the functions unique identifiers that the linker will understand.
The first intuitive idea is to use the full signature: add(int, int)->int, this would lead to a lot of extra code in the linker and confusion when multiple type names map to the same underlying type such as unsigned and unsigned int.
Since name mangling in Swift is not the main topic of this article, we try to explain some of its rules through the previous
dummyFunction example:
public class Dummy {
    public class AnotherDummyClass {
        public func dummyFunction(intDummyArg: Int, stringDummyArg: String, booleanDummyArg: Bool) -> String {
            return "I am just a dummy function."
        }
    }
}
Its mangled symbol is:
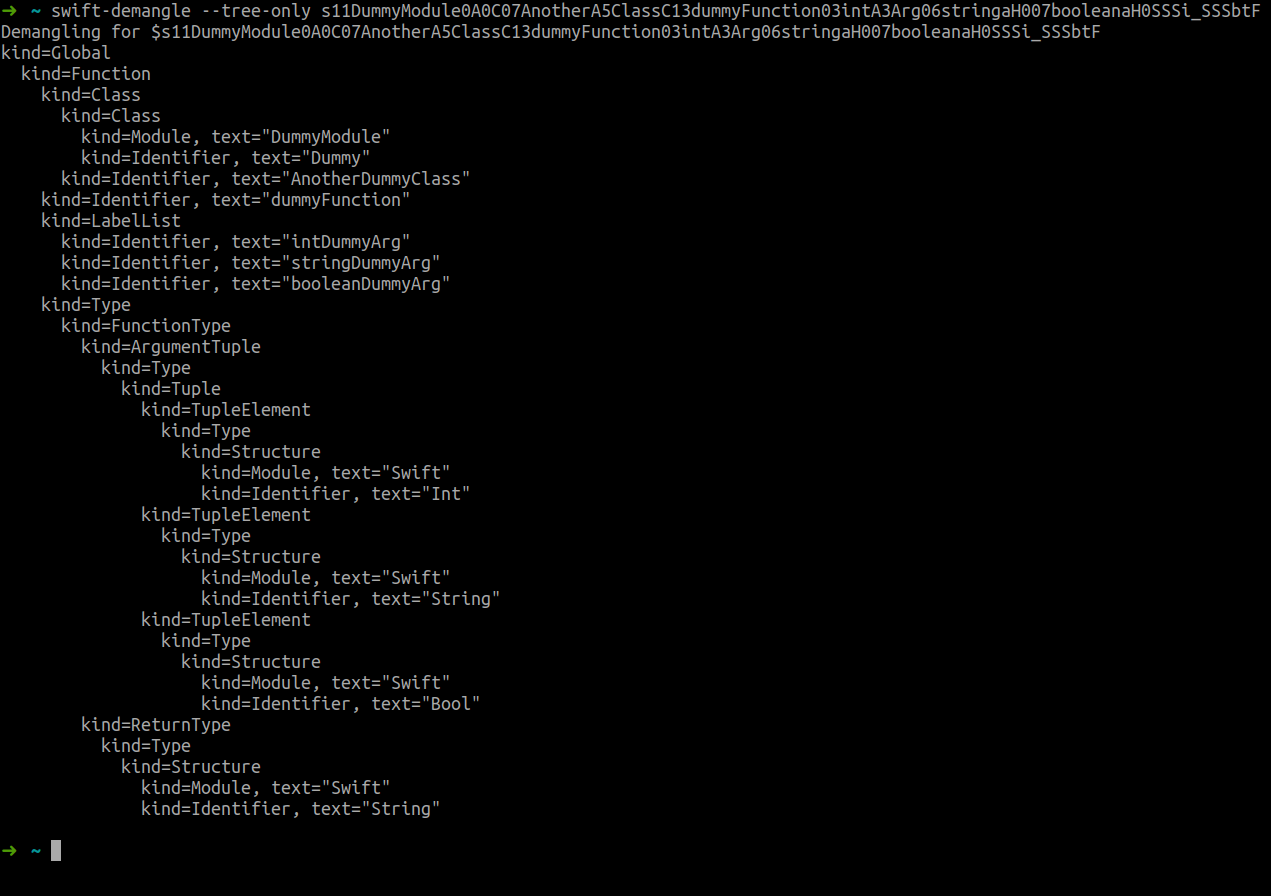
$s11DummyModule0A0C07AnotherA5ClassC13dummyFunction03intA3Arg06stringaH007booleanaH0SSSi_SSSbtF:
$s: Global swift symbol prefix;11DummyModule: The module name - 11 characters in length;0A0C: The identifier starts with0because Substitution will be used; the wordDummywill be used in the following occurrences as the characterA. SinceDummyis the last identifier, we end its mangled version with another0, and finally,Cmeans we are dealing with aClass;07AnotherA5ClassC:0means the identifier has word substitution,Another- 7 characters,Asubstitution forDummy,Class- 5 characters, and similar to the previous identifier,Cmeans we are dealing with a class;13dummyFunction: The function namedummyFunction- 13 characters in length;03intA3Arg:0for substitution, int-3 characters,Asubstitutes forDummy, and finally 3 characters forArg;06stringaH0: Similar to the previous argument, the only difference is thatArgwill be substituted;007booleanaH0: Similar to the previous argument;SS: Return typeSwift.String;Si: Argument typeSwift.Int;SS: Argument typeSwift.String;Sb: Argument typeSwift.Bool;F: The last symbol means that this is a symbol of aFunction.
Following is the return of the swift-demangle, a program designed for demangling Swift symbols.
Prepare the application
Utilizing frameworks like Frida, we prepare the application for instrumentation by incorporating necessary libraries and enabling the FridaGadget. The following setup allows for the injection of custom code and the monitoring of application behavior.
- Download the FridaGadet.dylib corresponding to your architecture from the main releases page;
- Move the FridaGadget.dylib to the
Frameworksfolder of your application; - Insert a load command for the gadget;
insert_dylib: “A command line utility for inserting a dylib load command into a Mach-O binary”; - When you run the application, it is expected to be stuck; it is waiting for the frida-client to attach;
- Here, multiple approaches can be used:
- For quick prototyping:
frida-ps - For developers monitoring their application, a simple Python script can be used to attach to the application;
- For quick prototyping:
    import frida
    def on_frida_message(message, data):
        # Callback to execute when a frida-message is received.

    device_id = "your-device-id"
    frida_device = frida.get_device(device_id)
    frida_session = frida_device.attach("gadget")
    script_path = "path/to/instrument.js"
    with open(script_path, "r") as f:
        frida_script = frida_session.create_script(f.read())
        frida_script.on("message", on_frida_message)
        frida_script.load()
- Depending on the use case, the body of the
on_frida_messagecallback can range from, simply printing on the terminal, persisting the stack traces in a file to passing them through security rules for analysis; - The missing part of the puzzle is the content of the
instrument.js. What exactly are we going to do when our function is intercepted? To answer that question, we need to understand a few points.
Instrumentation code
Swift ABI - Application Binary Interface
At runtime, Swift program binaries interact with other libraries and components through an ABI; An “Application Binary Interface”. It is the specification to which independently compiled binary entities must conform to be linked together and executed.
These binary entities must agree on many low-level details: How to call functions? How is their data represented in memory? and even where their metadata is and how to access it. Functions must also know how to call each other, which entails things like the layout of the call stack, what registers are preserved, and ownership conventions.
Calling Convention
Following is a slice of the register usage table for ARM64 & x86-64, for the full list and more details, check swift GitHub repository:
ARM64
| Register | Special | Purpose | Swift |
|---|---|---|---|
| x0 | Integer argument 1 (1st return value) | ||
| x1 | Integer argument 2 (2nd return value) | ||
| x2 - x7 | Integer arguments 3-8 | ||
| x8 | Indirect result location register | ||
| x16 | ip0 | Scratch registers | |
| x17 | ip1 | ||
| x18 | RESERVED DO NOT USE | ||
| x19 | Callee-saved register | self | |
| .. | .. | ..... | .. |
X86-64
| Register | Purpose | Swift |
|---|---|---|
| rax | Return value; also, for var-args, number of xmm registers used | |
| rbx | Callee-saved register | |
| rdi | Integer argument 1 | |
| rsi | Integer argument 2 | |
| rdx | Integer argument 3 (2nd return value) | |
| rcx | Integer argument 4 (3rd return value) | |
| .. | ..... | .. |
Arguments
We now know where the parameters of a function will reside, let’s try and extract them.
Booleans
Booleans can be accessed by directly reading the register holding the argument.
/** Get the boolean argument of a function.
 *
 * @param context Frida context giving access to register values.
 * @param argIndex Argument index to determine which offset is the arg pointer.
 * @returns The boolean value of the argument as an integer.
 */
function GetSwiftBoolArgument(context, argIndex, swiftRegisterShiftingIndex) {
    argIndex+=swiftRegisterShiftingIndex
    let register = getSwiftArgumentCorrespondingRegisterForARM64(context, argIndex);
    return Boolean(register.and(0x1).toInt32())
}
Integers
Same as booleans, integers are retrieved simply by accessing the value of the register.
/** Get the integer argument of a function.
 *
 * @param context Frida context giving access to register values.
 * @param argIndex Argument index to determine which offset is the arg pointer.
 * @returns The integer value of the argument.
 */
function GetSwiftIntArgument(context, argIndex, swiftRegisterShiftingIndex) {
    argIndex+=swiftRegisterShiftingIndex
    let register = getSwiftArgumentCorrespondingRegisterForARM64(context, argIndex);
    return  register.toInt32();
}
Strings
When Swift Strings are passed to a function, they can be passed in two ways depending on their size. If the size is less than 16 bytes, the string is passed on the stack, otherwise, it will be passed on the heap. Still, no matter the size, the object itself will follow the structure presented in the next drawing.
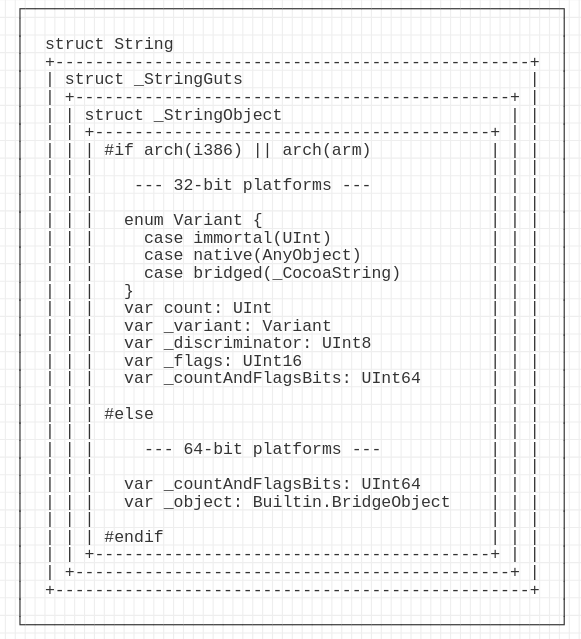
Less than 16 bytes
The string can be of a maximum of 16 bytes in length. On 64 architectures, registers are 64 bits, which means we need 2 registers to hold the string.
This information changes the whole understanding of the Calling Convention table we saw earlier. If a function takes 2 arguments where the first one is of type Swift.String and the second is of type Swift.Int, does the rule apply to integer arguments only?
    ```
    rdi:  Integer argument 1
    rsi:  Integer argument 2
    ```
If the rule doesn’t apply to integer arguments only, do we use the first register to store the string? Do we shift? If we have more than one argument, are all of them shifted?
To answer this question, we can simply run an application, attach using LLDB & take a peek into the register values.
- First, we run
lldbon the dummy module we saw in the mangling section;
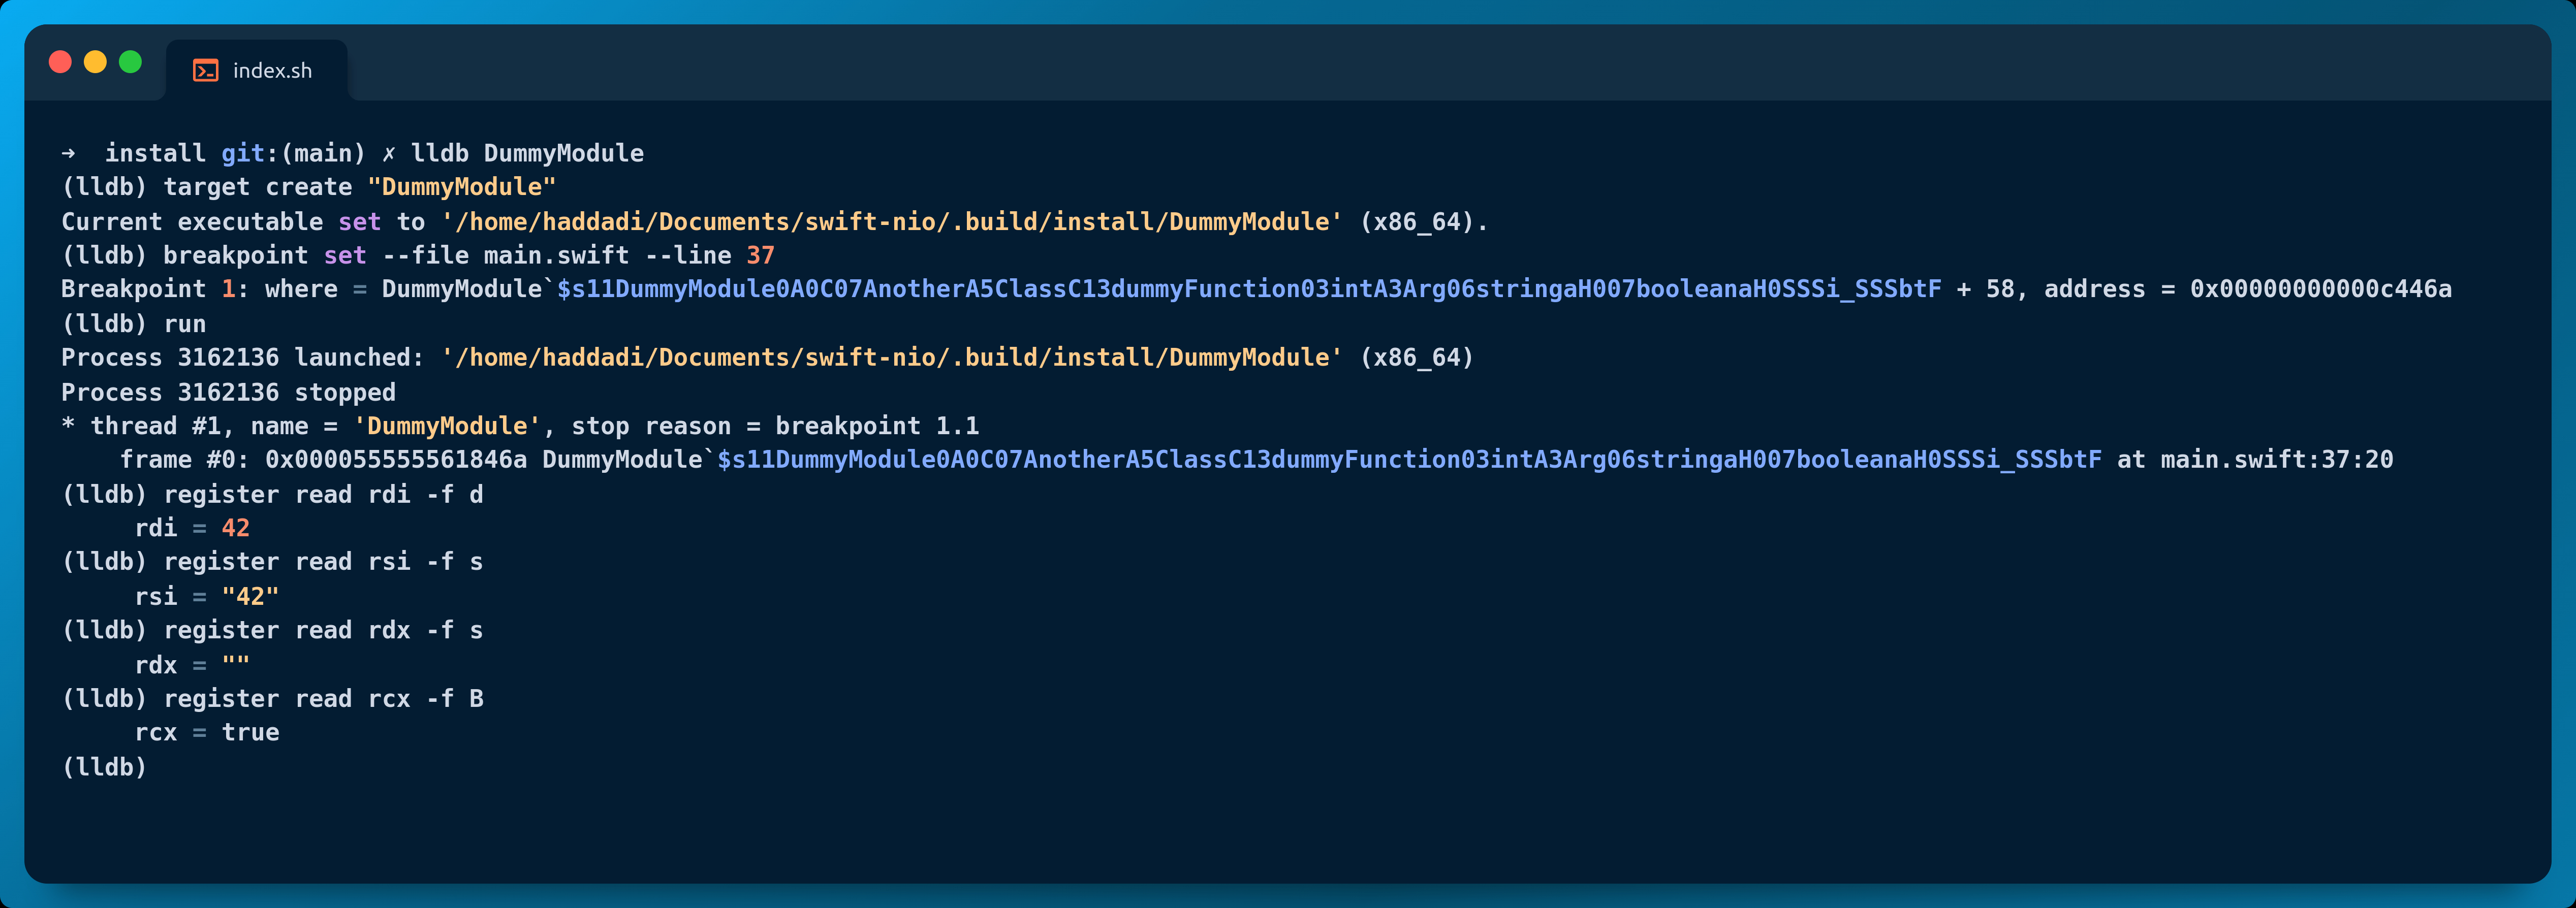
-> ~ lldb DummyModule
(lldb) target create "DummyModule"
- We set a breakpoint on the “dummyFunction” function;
(lldb) breakpoint set --file main.swift --line 37
Breakpoint 1: where = DummyModule`$s11DummyModule0A0C07AnotherA5ClassC13dummyFunction03intA3Arg06stringaH007booleanaH0SSSi_SSSbtF + 58 address = 0x00000000000c446a
- Run the program;
(lldb) run
Process 3162136 launched: '/home/haddadi/Documents/swift-nio/.build/install/DummyModule' (x86_64)
Process 3162136 stopped
* thread #1, name = 'DummyModule', stop reason = breakpoint 1.1
    frame #0: 0x000055555561846a DummyModule`$s11DummyModule0A0C07AnotherA5ClassC13dummyFunction03intA3Arg06stringaH007booleanaH0SSSi_SSSbtF at main.swift:37:20
- The first argument is of type integer and is supposed to be in the “rdi” register;
(lldb) register read rdi -f d
    rdi = 42
- The second argument is of type string, the second register “rsi”;
(lldb) register read rsi -f s
    rsi = "42"
- The following register “rdx”;
(lldb) register read rdx -f s
    rdx = ""

(lldb) register read rdx -f b
    rdx = 1110001000000000000000000000000000000000000000000000000000000000
The first byte 11100010 holds metadata about our object:
b63:isImmortal; Should the Swift runtime skip ARC. Small strings are just values, always immortal;b62: (large)isBridged/ (small)isASCII;b61:isSmall: Dedicated bit to denote small strings;b60:isForeign: aka is low, cannot provide access to contiguous UTF-8;- The last 4 bits represent the count: 0010 => 2.
To confirm the hypothesis, the rcx register responsible for holding the Integer argument 4 (check the table above), we’ll read its value in the boolean format -f B.
(lldb) register read rcx -f B
    rcx = true
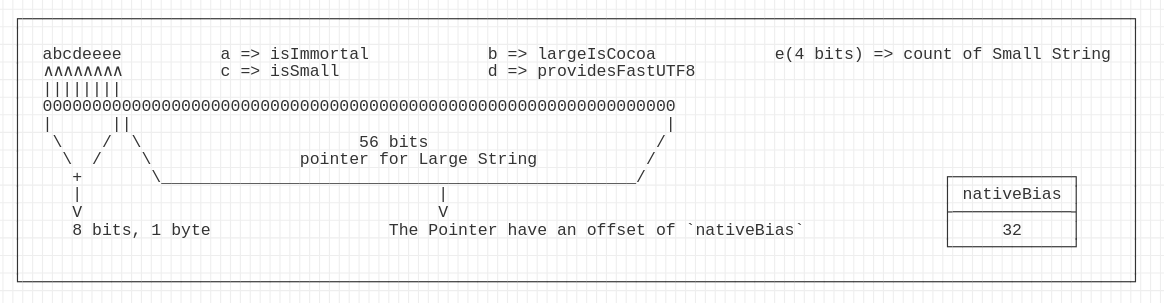
More than 16 bytes
The string literal is allocated on the heap, The corresponding registers (depending on the index of this string argument) hold metadata for the string and the pointer to the literal on the heap. The 8 bytes of the _object is stored on the second register following the drawing below.
This translates to
/** Extract the string value of the argument; case of strings with length > 16 bytes.
 *
 * @param secondRegister The second register used to hold the _object value.
 * @returns The string value of argument.
 */
function GetSwiftLargeStringArgument(secondRegister) {
      const ptr2hex = '0x' + secondRegister.toString(16);
      let ptr2value = BigInt(ptr2hex);

   // low 56 bits (check drawing above)
      let strAddress = '0x' + (ptr2value & 0xFFFFFFFFFFFFFFn).toString(16);
      let strPtr = new NativePointer(strAddress);
      let cstrPtr = strPtr.add(32); // Skip the offset (check drawing above)
      const message = cstrPtr.readCString() ?? "";

      return message
}
This distinction in handling based on string size is essential for accurate data extraction during instrumentation. By understanding and utilizing these conventions, researchers can effectively read and manipulate string arguments, enabling deeper insights into the application's runtime behavior.
Conclusion
In conclusion, swift dynamic instrumentation offers a cutting-edge approach to security automation, allowing for real-time analysis and control of software behavior.
We tried in earlier paragraphs to explain the main steps of dynamic instrumentation, and adjust it to the Swift use-case by going over name mangling, the Swift ABI, where function primitive type arguments are stored, and importantly how.
In the following article, we will expand to arguments of Non-primitive types, and how to deal with functions that run in the Objective-C runtime, UIKit and AppKit as an example.